Litle HowTo prepare Boost and RCF on Mac!
My work environment is Mac OS X Snow Leopard 10.6.6 and Xcode 3.2.5
Boost version is 1.45.0 and RCF version is 1.3
What is Boost and RCF?
Boost is a powerful and portable C++ library.
RCF is a Remote Call Framework something like RPC.
The two libraries written in C++ seems to be Cross Platform and Cross Compiler also 64 bit.
From RCF documentation only one thing must be done.
Use of the typedef’s in “boost/cstdint.hpp” for portability.
The first step is to download and compile boost.
The official site is http://www.boost.org/
Extract downloaded file to your working directory, start terminal and navigate to the root of the extracted boost directory then execute “bootstrap.sh”
It’s build a bjam command-line tool that drives the Boost Build system.
cd ~/Documents/boost_1_45_0/

./bootstrap.sh --with-libraries=all
Run bjam and wait, wait a lot!
./bjam --layout=tagged variant=debug -j 2 architecture=combined-x86-power stage
| ————(OPTIONS)———— |
--toolset=darwin
Apple’s version of the GCC toolchain with support for Darwin and MacOS X features such as frameworks. |
--build-type=complete
Build all supported variants of the libraries. |
--layout=tagged
Names of boost binaries include the encoded build properties such as variant and threading. |
--with-<libraryname>
Build specified library. |
--show-libraries
Displays the list of Boost libraries. |
--clean
Remove targets instead of building. |
-j N
Run up to N commands in parallel. Only for multiprocessor compilation. |
| ————(PROPERTIES)———— |
address-model=32,64,32_64
Explicitly request either 32-bit or 64-bit code generation. |
runtime-link=shared,static
Linking to the C++ standard library and compiler runtime support libraries. |
link=shared,static
Determines if bjam creates shared or static libraries. |
threading=single,multi
Cause the produced binaries to be thread-safe. |
variant=debug,release,profile,debug-python
Choosing a specific build variant by adding release or debug. |
architecture=x86,ia64,power,combined,combined-x86-power
|
Now boost library is compiled and ready. Next step is RCF framework.
The Official site is http://deltavsoft.com/
Download and extract RCF-1.3 to your working directory.
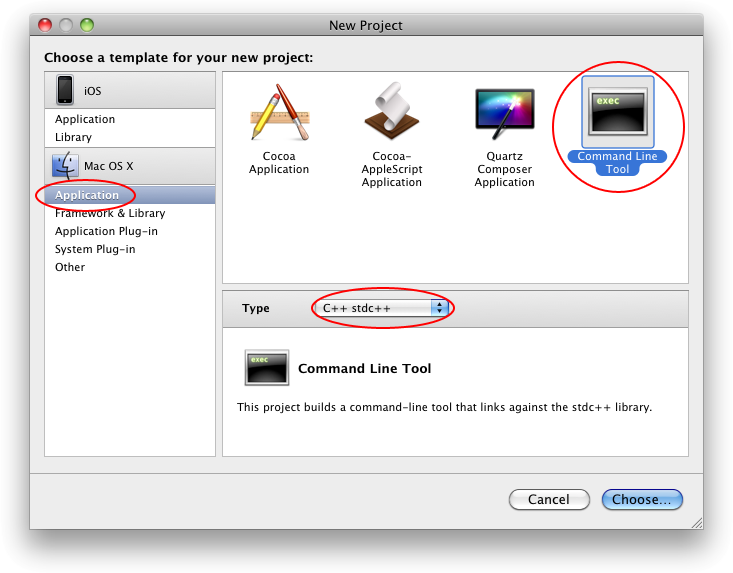
Create a new command-line project with Xcode.
Don’t forget to select “C++ stdc++” in Type box!
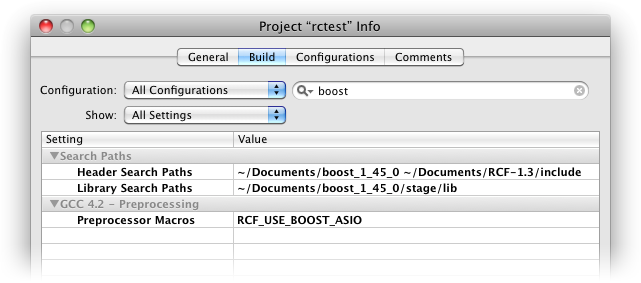
Go to “Project” menu and select “Edit project Settings” then select “Build” tag. Search for “Header Search Paths” settings and append RCF and Boost include path in the list. Search for Preprocessor Macro and add “RCF_USE_BOOST_ASIO”. Set also “Library Search Path” to “boost_1_45_0/stage/lib”.
Finally in the main window go to “Source” select and right-click, select “Add”, then “Existing Files”, navigate to “RCF-1.3/src/RCF”, find and add “RCF.cpp” file. Also go to “Targets” -> “Link Binary With Libraries” and add “libboost_system.a” and others “.a” files from the “boost_1_45_0/stage/lib” directory.
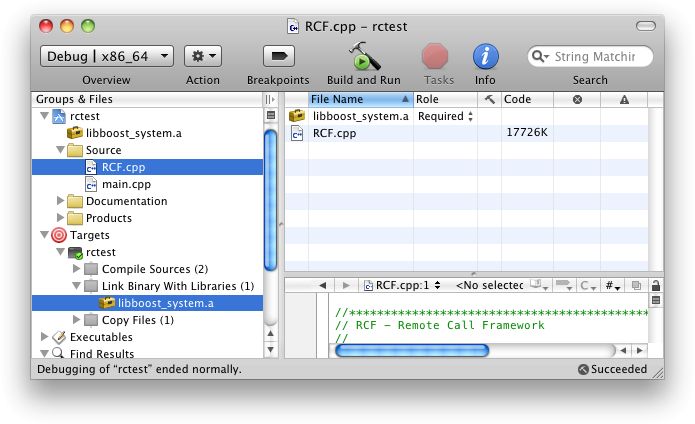
Open main.cpp and insert test code.
#include <iostream>
#include <rcf /Idl.hpp>
#include </rcf><rcf /RcfServer.hpp>
#include </rcf><rcf /TcpEndpoint.hpp>

RCF_BEGIN(I_Echo, "I_Echo")
RCF_METHOD_R1(std::string, echo, std::string)
RCF_END(I_Echo)

class Echo
{
public:
    std::string echo(const std::string &s)
    {
        return s;
    }
};

int main (int argc, char * const argv[])
{
	Echo echo;
	RCF::RcfServer server( RCF::TcpEndpoint("127.0.0.1", 50001));
	server.bind<I_Echo>(echo);
	server.start();
	std::cout < < "Server running..." << std::endl;

	RcfClient<I_Echo> client( RCF::TcpEndpoint("127.0.0.1", 50001));

	std::string dts;
	std::cin >> dts;

	std::string ecs = client.echo(dts);

	std::cout << "Echo: " << ecs << std::endl;

    return 0;
}
External links:
Boost.Build is a high-level build system http://www.highscore.de/cpp/boostbuild/
RCF User Guide http://deltavsoft.com/w/RcfUserGuide/1.3/index.html
Linking Custom Static Libraries from your iPhone Xcode Projects http://wiki.remobjects.com/wiki/Linking_Custom_Static_Libraries_from_your_iPhone_Xcode_Projects
The Boost C++ Libraries BoostBook Documentation Subset http://www.boost.org/doc/libs/1_45_0/doc/html/index.html
Compiling Boost for the iPhone http://iphone.galloway.me.uk/2009/11/compiling-boost-for-the-iphone/
